top of page
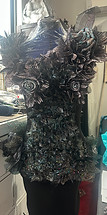
Poignant Rose


Design Process


Step 1:
-
Cut fabric into differing sizes of horizontal strips
-
Cut horizontal strips into rhombus'

Step 2:
-
Scrunch rhombus' in the center to create a 3D effect
-
Tack stitch in the center to hold the shape
-
On the larger rhombus', add stiff tulle rhombus' on the back of the fabric, but offset the shapes to create more dimension

Step 3:
-
Create complimentary fabric roses for textile layout on dress


Step 4:
-
Start pinning fabric on base dress to create a layout
-
Glue or hand sew onto dress

Step 5:
-
Create layout in sections to allow time for glue to dry

Step 6:
-
Add leather strips around bodice to tighten waist shape
Final Product

bottom of page